Friday, February 23, 2007

Snow pics!


I thought I would post some pictures I took during our little snowstorm the other day. I haven't had a chance to scrap them, but will soon!

Tuesday, February 20, 2007

I am NOT ignoring my blog!

I swear! I have been working LONG hours making digital kits! I am going to open a store as soon as I have enough product, so keep an eye out for a big grand opening!

Also, I have a few more freebies to post, just have to put the final touches on them!

Friday, February 16, 2007

Freebie

Download a sampler from the below kit here.

I hope you like it!

I finished my first kit!


Well, over the last two days, I have been learning all kinds of new tricks for PSE. I decided to try to make a digital kit and *I* think it is wicked cute! I will post it as a freebie as soon as I figure out how!

Tuesday, February 13, 2007

Maybe a snow day?!?!

We are supposed to get our first big snowstorm of the year tonight! By the end of Wednesday, we are expecting 2 1/2 feet! Woo Hoo! I have an extra day to get the kids' Valentines ready for school! LOL!

Tutorail: Your first SIMPLE page

Are you ready?! We are going to create a VERY simple layout. Just plopping a picture and some elements on a page to get the feel for the program.

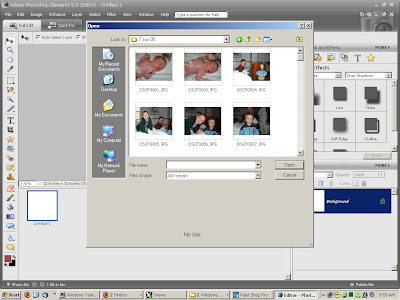
1. Start by going to 'file' and 'open' and go find a picture for your page. Since this is just a lesson, don't worry about the photo, you just need one to play with.


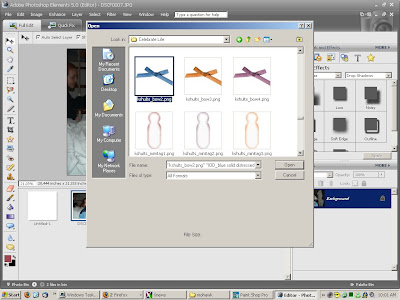
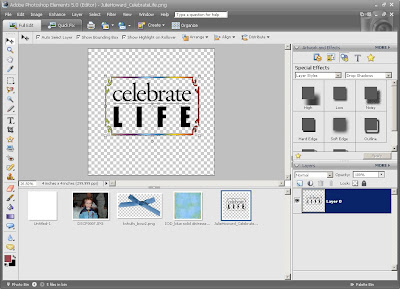
2. Now that you have a photo open, you will see it in your photo bin (the big box on the very bottom of the program). OK, now go to wherever you saved your digital kits and pick out which one you would like to use on your layout. I usually open either the entire kit (just so I have lots of options) or I may already know what I want for the layout so I just open those elements. For this lesson, try to select a background paper and a few '3D' type embellishments (ribbon, word art, brads, etc.).


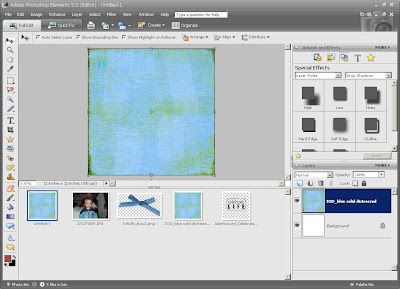
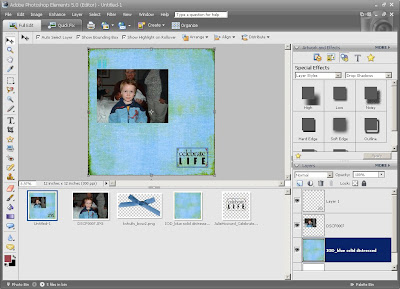
3. With me so far? Easy, right?! OK, so you have a workspace, a picture, and elements. The first thing you want to do is make sure your 'move' tool is activated (the 4-way arrow at the very top of your tool bar). This tool will allow your to move elements once they are on your page. Now, click on your background paper down in the photo bin and drag it up onto your workspace. It'll take a few second for it to appear.

You will notice in your layer palette (the box in the bottom right of your screen) that you now have 2 layers...your background and the paper. The layer palette is an AWESOME tool. It shows you the order of the elements on your page. Think of your page as a stack of transparencies with the elements printed on them...you can arrange the pages to move things forward and backward in perspective.


4. So, now you can drag your photo up onto the page. When you do so, you may want to resize it. To do so, you will notice when you click on the photo, it will have a dotted box around it with squares at the corners and the sides. You can click and drag these boxes to resize the photo. Use the corner boxes to make it bigger or smaller as they will keep the aspect ratio of the photo true.

If you look at the Layers Palette again, you will notice the photo layer is blue. That means it is the layer you are working on. Anytime you want to know what layer is selected, take a peek down there.


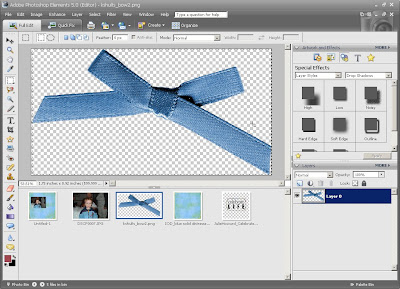
5. So, our page needs some Oomph! Click on one of the embellishments you opened . Use the 'marquee' tool ( the dotted square on the tool bar). Highlight the entire element and then hit 'control 'c'' to 'cut' out the element. Now, you can go back and click on your page in the photo bin and hit 'control 'v'' to paste the element on your page. Now, it may not show up as the top layer on your page. All you need to do is look in your layers palette and see if it is on the top. If not, just click and drag it there. You can also make sure the embellishment is highlighted in the layers palette, click your 'move' tool on the tool bar, and then look on the top of the screen you will see 'arrange'. This tool will allow you to move the elements . You can click 'move to front' to have the element be the first on the page.


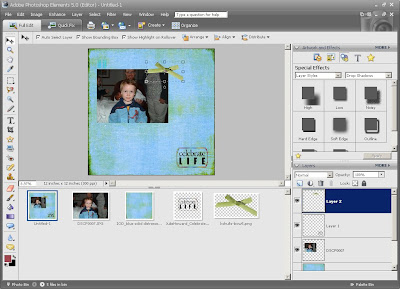
6. Once you have the embellishments on your page, you can use the 'move' tool to click on them and arrange them on the page as you like. When you click on them, you will see a blue box around the element. This means the element is selected and is ready to be moved. Just click and hold the mouse and drag the element wherever on the page you want it.


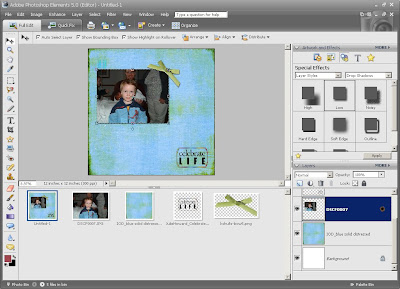
7. The last really basic step for a layout is adding drop shadows. These are the shadows a paper scrapbook page has that the elements make because of their dimension. Digital scrappers recreate these shadows with drop shadows.

In your 'layer palette' (top right of the screen) you can click on 'layer styles' and then 'drop shadows'. Then, all you have to do is select an element to add a shadow to (either by clicking on it in the layer palette or by clicking on it on the page itself) and select the 'low' shadow and then click 'apply'. You will see a slight shadow on your element! So cool! Also, in the layer palette, you will notice a little sun icon on the layer.


8. Well, there you go! A super duper basic page to get you started. I really find trial and error are the best ways to learn. I have learned so much just by clicking on stuff! And remember, you can undo anything in the digital world, so don't worry about making mistakes! It is awesome! LOL!

Saving your pages is super easy, too. Just hit 'file' 'save as' and save it to a folder somewhere on your computer. I save my pages as jpegs just so they don't take up so much space and I can upload then to the net.

If you have ANY questions, please comment to this post and I will answer them there. Good Luck! I am going to see if I can get a member gallery somehow so I can upload your pages to my blog! I think that would be awesome!

Just for fun!

YOUR REAL NAME:
Sarah

YOUR GANGSTA NAME (1st 4 letters plus izzle):
Sarizzle (I took the a out - it sounded better! LOL)

YOUR DETECTIVE NAME (fave color + fave animal):
Pink Frog

YOUR SOAP OPERA NAME (middle name + childhood street):
Marie Whitehead

YOUR STAR WARS NAME (last 3 letters of your last name + first 2 letters of your first name + first 3 letters of Mom's maiden name):
Peasadea

YOUR SUPER HERO NAME (2nd fave color + fave drink):
Purple Mudslide

YOUR IRAQI NAME (2nd letter of your first name + 3rd letter of your last name + any letter of your middle name + 2nd letter of your Mom's maiden name + 3rd letter of your Dad's middle name + 1st letter of a sibling's first name + last letter of your Mom's middle name):
Aareesn

YOUR WITNESS PROTECTION PROGRAM NAME (Grandma/Grandpa's first name + Jones):
Elsie Jones

YOUR GOTH NAME (Black + name of one of your pets):
Black Raven

Monday, February 12, 2007

Tutorial: Creating your workspace

Alrighty, so we have our digi kit all unzipped and just begging to be made into a page. Here are the basics of opening a workspace to build your page on.

I use Photoshop Elements 5.0 so everything will be geared toward that program.

1. This is what my program always looks like. There are a few options I always have open when I scrap. If you click on 'window' you can choose these options also...tools, layers, palette bin, and photo bin. I find that having these options open just saves time and frustration.


2. To create a blank scrapbook page, click on 'file', 'new', 'blank file'. A dialog box will open that gives you some options. I scrap in 12x12 so I always choose '12 inches' for both width and height. Of course, you can choose 6x6 or 8x8...whatever size you like to scrap in. Be sure to set the 'resolution' to 300 dpi and the 'color mode' to RGB color.


3. Voila! a beautiful blank page!

Sunday, February 11, 2007

Tutorial: How to unzip digital files

OK, so you are back from Two Peas or Shabby Princess and have saved a few freebie kits to try out. Now what? You have made yourself a nice little folder somewhere on your computer and saved them there, so now comes the unzipping so you can see what goodies are in there and so you can use them!

1. Go to wherever you saved your kits and double click on one. This is what you will see. The file is compressed or 'zipped' to save space and we have to open it to be able to use it. Double click on the file and head to step 2.


2. Another window will open for the program your computer uses to unzip files (we use WinRAR). There will be one or more folders. Sometimes designers include the entire kit in one folder (such as this one) and some choose to have different files for papers, embellishments, alphas, etc.). If there's more than one folder, you have to do the following steps with each folder.


3. When you double click on the folder, you will be able to see what files it contains. You need to still have the window open where you originally saved the file because you are going to highlight all the files and drag them to the original window.


4. You will see the transfer of files from the zip program to the original window.


5. Once the transfer is complete, you can go to the original window and see your newly unzipped kit. I like to click on 'thumbnails' so I can see the actual elements.


6. Congratulations! You have successfully unzipped your kit and it is ready to use!

Saturday, February 10, 2007

Tutorials coming soon!

I think some tutorials would be super cool! I will start posting some as soon as my Hubby teaches me a few technical things. I will start at the VERY beginning and go right up to what I know. As I learn new tricks, so will you!

I will start the first of them this weekend!

Sweet Shoppe Spin-A-Lift

Every week over at Sweet Shoppe Designs, the pick a designer for us to scraplift from. Our challenge is to choose a layout and spin it before lifting it. Gina Miller was this week's designer. She is super talented and it was fun to scraplift one of her layouts.

Here is Gina's layout that I chose.
And...here is mine!


Her Nursery kit designed by Christy Lyle and Robin Carlton. Available at Sweet Shoppe Designs.

Friday, February 09, 2007

If I were a cookie...

You Are a Chocolate Chip Cookie

Traditional and conservative, most people find you comforting.
You're friendly and easy to get to know. This makes you very popular - without even trying!


This is for the blog challenge over at Sweet Shoppe Designs!

Thursday, February 08, 2007

I love these pictures of Kira


One day when we went to our friends Bekki and Jon's house, Bekki took these amazing pictures of Kiki. Bekki is a VERY talented photographer and one of the most wonderful people I know. Here is her website...http://www.rpicardphotography.com/index.html

I wanted to do a really simple page that really showcased the photo...I played around with all kinds of background colors and embellishments, but I really love the white. The swirls were just enough to frame the photo and the colors were adorable together.

Swirls designed by Ida.

Monday, February 05, 2007

I am SO excited!

Well, I just finished the first week of my diet and I lost 8.5 pounds!!!! Now, I know my weekly amount won't stay that high, but WOO HOO!!!! I'm gunna be a sexy Mama for Alice's wedding!

Sunday, February 04, 2007

Best Friends


Slayton and Quentin have been best friends since they were born. I'm so glad we have remained close all these years!

Clique Happy kit designed by Lynds Deeds

Saturday, February 03, 2007

OK! OK! Last one for today!


Here is Kiki within the first five minutes after birth. She was already so adorable!

Think Pink and Boho Flourish frames from Scrap Artists.
Crocheted Lace by Shannon Lee.

On a roll!


Just another layout.

My poor Riley...we have always joked that he is 'just a little off'! He doesn't have red hair like his brother and sister, he wasn't born on a day with a '6' in it (he just missed it with a '5'!), and he has his language delays. But, these are the things that make Riley, well...Riley! I can't imagine him with red hair or perfect speech. These are the things that make him unique. They make him special.

Color Happy papers designed by Michelle Coleman.
Fun in the Sun stitching designed by Laura Judd.
Brads from the Celebrate Life collaborative kit available at A Cherry on Top.
Grunge Edge alpha freebie.

I told you so!!


I've wanted to do this page for a long time! I heard SO many times while I was pregnant with Kiki 'there is no way you are having a girl!', 'I know the ultrasound says it's a girl, but those are never right!'. Arg! Well, here she is, my little ball of fire! She has her mama's hair and temper!

Carnival kit designed by Suzy Nunes and available at Sweet Shoppe Designs.

Accidental Summer haircut!


I loved Slayton with his mohawk and was sad when he wanted to get a 'regular haircut' for school. He didn't want to be the only one with a mohawk and was afraid he would be teased. I can't wait for my kids to get to the age where they realize what others think is not important. I want them to grow up and enjoy their individuality. For now though, I can understand.

Surfer Boy kit designed by Zoe Pearn.